This is archived documentation for InfluxData product versions that are no longer maintained. For newer documentation, see the latest InfluxData documentation.
Chronograf alert endpoints can be configured using the Chronograf user interface to create Kapacitor-based event handlers that send alert messages. You can use Chronograf to send alert messages to specific URLs as well as to applications.
This guide offers step-by-step instructions for configuring Chronograf alert endpoints.
Kapacitor event handlers supported in Chronograf
Chronograf integrates with Kapacitor, InfluxData’s data processing platform, to send alert messages to event handlers. Chronograf supports the following event handlers:
- Alerta
- Exec
- HipChat
- HTTP/Post
- Kafka
- Log
- OpsGenie
- OpsGenie2
- PagerDuty
- PagerDuty2
- Sensu
- Slack
- SMTP/Email
- Talk
- Telegram
- TCP
- VictorOps
To configure a Kapacitor event handler in Chronograf, install Kapacitor and connect it to Chronograf. The Configure Kapacitor page includes the event handler configuration options.
Alert endpoint configurations
Alert endpoint configurations appear on the Chronograf Configure Kapacitor page. You must have a connected Kapacitor instance to access the configurations. For more information, see Kapacitor installation instructions and how to connect a Kapacitor instance to Chronograf.
Note that the configuration options in the Configure alert endpoints section are not all-inclusive. Some event handlers allow users to customize event handler configurations per alert rule. For example, Chronograf’s Slack integration allows users to specify a default channel in the Configure alert endpoints section and a different channel for individual alert rules.
HipChat
HipChat is an Atlassian web service for group chat, video chat, and screen sharing. Configure Chronograf to send alert messages to a HipChat room. The sections below describe each configuration option.

Subdomain
The HipChat subdomain name.
Identify the subdomain in your HipChat URL;
for example, the subdomain in the Hipchat URL https://example-hi.hipchat.com/home is example-hi.
Room
The HipChat room name. Chronograf sends alert messages to this room.
Token
A HipChat API access token for sending notifications. The following steps describe how to create the API access token:
From the HipChat home page (
https://<your-subdomain>.hipchat.com/home), access Account settings by clicking on the person icon in the top right corner.Select API access from the items in the left menu sidebar.
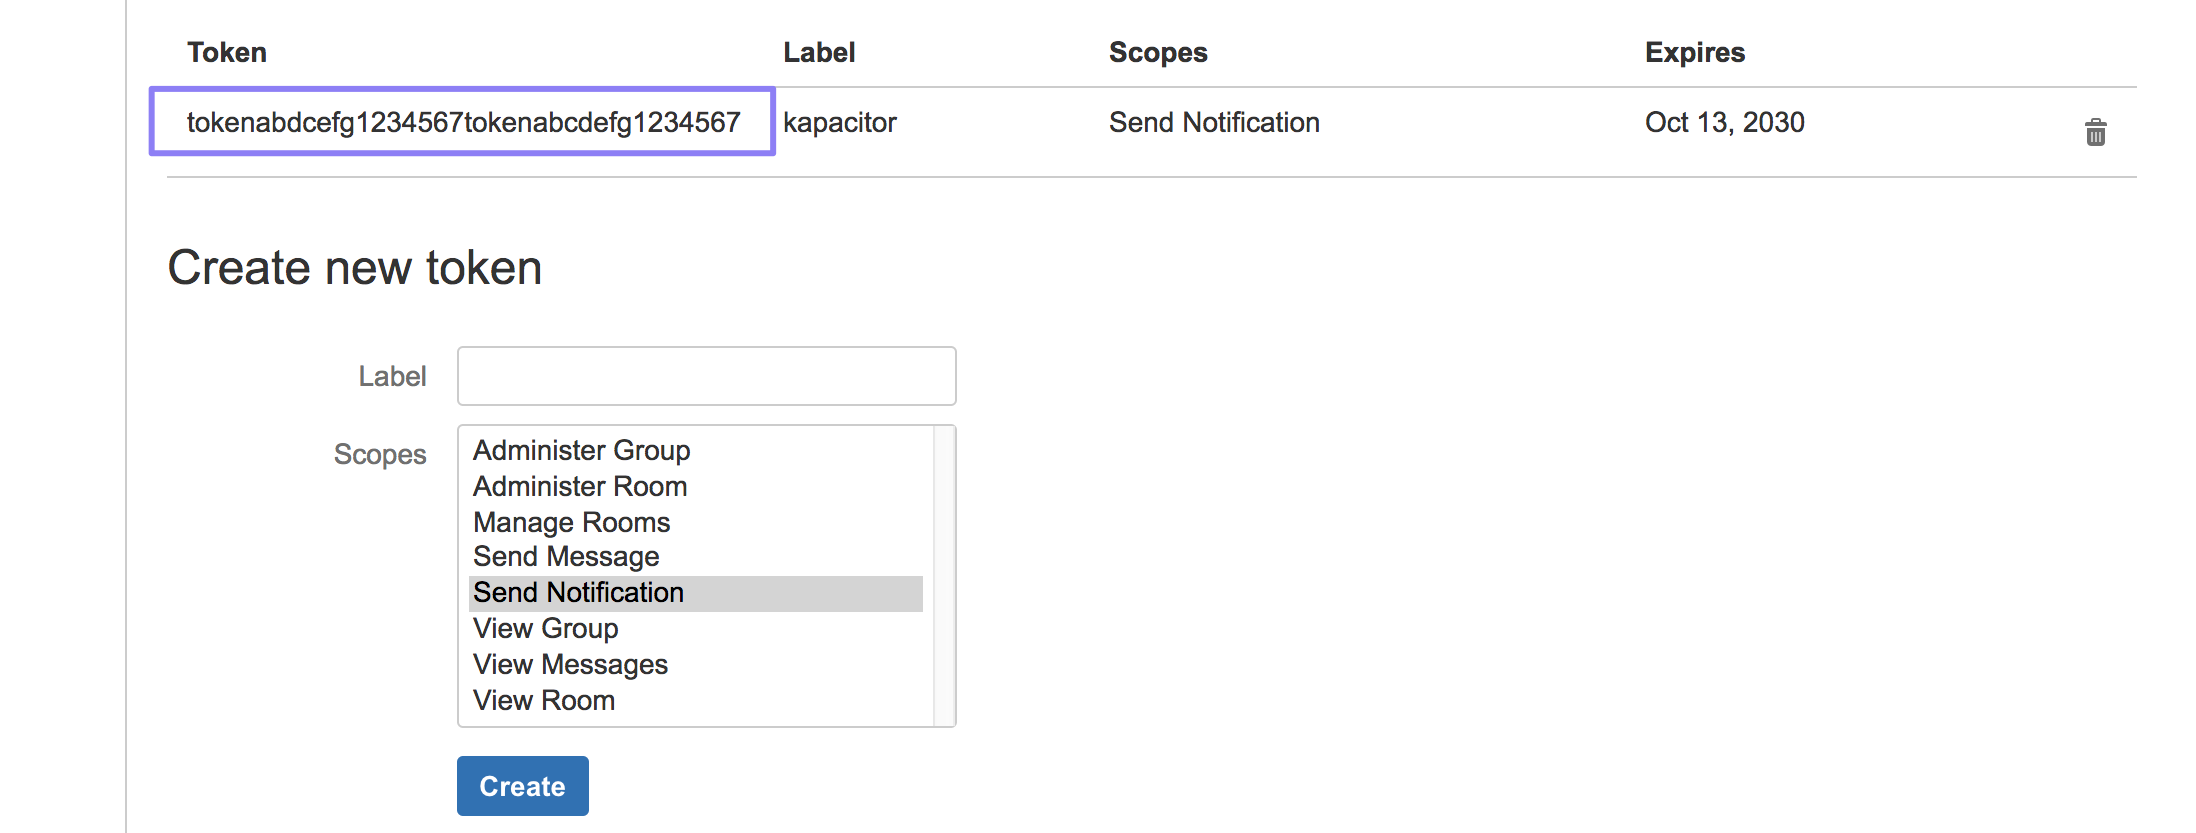
Under Create new token, enter a label for your token (it can be anything).
Under Create new token, select Send Notification as the Scope.
Click Create.
Your token appears in the table just above the Create new token section:
Kafka
To configure a Kafka alert endpoint:
- In the Configure Alert Endpoints of the Configure Kapacitor Connection page, click the Kafka tab.
Enter the following:
- ID: Unique identifier for a Kafka cluster. Default is
localhost. - Brokers: List of Kafka broker addresses, using the
host:portformat. - Timeout: The maximum amount of time to wait before flushing an incomplete batch. Default is
10s. - Batch Size: Number of messages batched before sending to Kafka. Default is
100. - Batch Timeout: Timeout period for the batch. Default is
1s. - Use SSL: Check to enable SSL communication.
- SSL CA: Path to the SSL CA (certificate authority) file.
- SSL Cert: Path to the SSL host certificate.
- SSL Key: Path to the SSL certificate private key file.
- Insecure Skip Verify: Check to use SSL, but skip chain and host verification. Required if using a self-signed certificate.
- ID: Unique identifier for a Kafka cluster. Default is
Click Save Changes to save the configuration settings.
Click Send Test Alert to verify the configuration.
See Kafka event handler (Kapacitor) in the Kapacitor documentation for details about enabling OpsGenie services using TICKscripts.
OpsGenie
The original OpsGenie alert endpoint is deprecated – use the OpsGenie2 alert endpoint.
Note: Support for OpsGenie Events API 1.0 is deprecated. As noted by OpGenie, API v1 will be inaccessible for all customers as of June 30, 2018.
OpsGenie2
Send an incident alert to OpsGenie teams and recipients using the Chronograf alert endpoint.
To configure a OpsGenie alert endpoint:
- In the Configure Alert Endpoints of the Configure Kapacitor Connection page, click the OpsGenie tab.
Enter the following information:
- API Key: API key (or GenieKey). The API Key can be found by signing into your OpsGenie account and selecting the Settings menu option in the Admin menu.
- Teams: List of OpsGenie teams to be alerted.
- Recipients field, enter the list of OpsGenie team members) to receive alerts.
Click Save Changes to save the configuration settings.
Click Send Test Alert to verify the configuration.
See Alert API in the OpsGenie documentation for details on the OpsGenie Alert API
See OpsGenie V2 event handler in the Kapacitor documentation for details about the OpsGenie V2 event handler.
See the AlertNode (Kapacitor TICKscript node) - OpsGenie v2 in the Kapacitor documentation for details about enabling OpsGenie services using TICKscripts.
PagerDuty
The original PagerDuty alert endpoint is deprecated – use the PagerDuty2 alert endpoint.
PagerDuty2
Send an alerts about recognized events to PagerDuty using the Chronograf PagerDuty alert endpoint.
To configure a PagerDuty alert endpoint:
- In the Configure Alert Endpoints of the Configure Kapacitor Connection page, click the PagerDuty tab
Enter the following:
- Routing Key: GUID of your PagerDuty Events API V2 integration, listed as “Integration Key” on the Events API V2 integration’s detail page. See Create a new service in the PagerDuty documentation details on getting an “Integration Key” (
routing_key). - PagerDuty URL: URL used to POST a JSON body representing the event. This value should not be changed. Valid value is
https://events.pagerduty.com/v2/enqueue. - Configuration Enabled: Check to enable this configuration.
- Routing Key: GUID of your PagerDuty Events API V2 integration, listed as “Integration Key” on the Events API V2 integration’s detail page. See Create a new service in the PagerDuty documentation details on getting an “Integration Key” (
Click Save Changes to save the configuration settings.
Click Send Test Alert to verify the configuration.
See the PagerDuty Events API V2 Overview for details on the PagerDuty Events API and recognized event types (trigger, acknowledge, and resolve).
See AlertNode (Kapacitor TICKscript node) - PagerDuty v2 in the Kapacitor documentation for details about enabling a new “Generic API” service using TICKscripts.
Slack
Slack is a popular messaging app for teams. Configure Chronograf to send alerts to an existing Slack channels or as a direct messages (DMs). The sections below describe each configuration option.
Nickname this Configuration
Add a unique name for a Slack endpoint if you configure more than one Slack alert endpoint. This field is not available unless at least one Slack endpoint has been configured.
Slack WebHook URL
The optional Slack WebHook URL allows you to post messages from Chronograf to Slack. The following steps describe how to create a Slack WebHook URL:
Visit Incoming Webhooks for details on how to send data into Slack in realtime.
Follow the steps on this page to create an incoming webhook integration in your Slack workspace.
Select a channel or DM in the
Post to Channelsection.
This step is necessary for creating the WebHook. Note that you can configure Chronograf to send messages to a different Slack channel or DM later.
- On your Incoming Webhooks page, click Add Incoming WebHooks integration.
- In the Slack Webhook URL field, enter the Slack WebHook URL that is listed as Webhook URL on the Incoming Webhooks page.
Slack Channel (optional)
Chronograf sends alert messages to the specified Slack channel, or DM (direct message).
Prefix the Slack channel with #, or the DM (direct message) with @. For example, #chronocats is a channel and @chronothan is a DM.
If this field is empty (not specified), Chronograf sends alert messages to the channel or DM selected for the Slack WebHook URL or to the channel or DM specified in the alert rule.
The channel or DM specified in the alert rule takes precedence over both the Slack Channel configuration option and the WebHook URL configuration.
Configuration Enabled
Check the Configuration Enabled checkbox to enable this configuration.
Save Changes
Click Save Changes to save the Slack configuration.
Send Test Alert
Click Send Test Alert to test your alert endpoint configuration.
Add Another Config
Click Add Another Config to add additional Slack alert endpoints. Each additional Slack alert endpoints requires you to specify a unique identifier in the Nickname this Configuration field that becomes enabled after the initial Slack alert endpoint is configured.
Telegram
Telegram is a popular messaging app. Configure Chronograf to send alert messages to an existing Telegram bot. The sections below describe each configuration option.

Telegram bot
Chronograf sends alerts to an existing Telegram bot. The following steps describe how to create a new Telegram bot:
Search for the
@BotFatherusername in your Telegram applicationClick
Startto begin a conversation with@BotFatherSend
/newbotto@BotFather
@BotFather responds:
Alright, a new bot. How are we going to call it? Please choose a name for your bot.
@BotFather will prompt you through the rest of the bot-creation process;
feel free to follow his directions or continue with our version of the steps below.
Both setups result in success!
- Send your bot’s name to
@BotFather
Your bot name can be anything.
Note that this is not your bot’s Telegram @username;
you’ll create the username in step 5.
@BotFather responds:
Good. Now let's choose a username for your bot. It must end in `bot`. Like this, for example: TetrisBot or tetris_bot.
- Send your bot’s username to
@BotFather
Your bot’s username must end in bot.
For example: mushroomKap_bot.
BotFather responds:
Done! Congratulations on your new bot. You will find it at t.me/<bot-username>. You can now add a description, about section and profile picture for your bot, see /help for a list of commands. By the way, when you've finished creating your cool bot, ping our Bot Support if you want a better username for it. Just make sure the bot is fully operational before you do this.

Use this token to access the HTTP API:
`<API-access-token>`

For a description of the Bot API, see this page: https://core.telegram.org/bots/api
- Begin a conversation with your bot
Click on the t.me/<bot-username> link in @BotFather’s response
and click Start at the bottom of your Telegram application.
Your newly-created bot will appear in the chat list on the left side of the application.
Token
The Telegram API access token. The following section describes how to identify or create the API access token.
Telegram’s @BotFather bot sent you an API access token when you created your bot.
See the @BotFather response in step 5 of the previous section for where to find your token.
If you can’t find the API access token, create a new token with the steps below:
Send
/tokento@BotFatherSelect the relevant bot at the bottom of your Telegram application
@BotFather responds with a new API access token:
You can use this token to access HTTP API:
<API-access-token>

For a description of the Bot API, see this page: https://core.telegram.org/bots/api
Chat ID
The Telegram chat ID. The following steps describe how to identify your chat ID:
Paste the following link in your browser. Replace
<API-access-token>with the API access token that you identified or created in the previous section:https://api.telegram.org/bot<API-access-token>/getUpdates?offset=0Send a message to your bot.
Send a message to your bot in the Telegram application. The message text can be anything; your chat history must include at least one message to get your chat ID.
Refresh your browser.
Identify the chat ID.
Identify the numerical chat ID in the browser.
In the example below, the chat ID is 123456789.
    {"ok":true,"result":[{"update_id":XXXXXXXXX,
    "message":{"message_id":2,"from":{"id":123456789,"first_name":"Mushroom","last_name":"Kap"},"chat":{"id":123456789,"first_name":"Mushroom","last_name":"Kap","type":"private"},"date":1487183963,"text":"hi"}}]}
Select the alert message format
Select Markdown (default) or HTML to specify the formatting for your alert messages.
Disable link previews
Select this option to disable link previews in alert messages.
Disable notifications
Select this option to disable notifications on iOS Devices and sounds on Android devices. Android users will continue to receive notifications.